NodeJs – Write Test case and Code Coverage using SonarQube

Key Points
In the ever-evolving world of software development, maintaining code quality is crucial. This is where tools like SonarQube and practices like unit testing come into play. Together, they ensure that the code is functional, clean, maintainable, and free from bugs. This guide will walk you through writing test cases in Node.js, integrating them with SonarQube, and achieving comprehensive code coverage.
Let’s start by exploring the first SonarQube integration in NodeJS.
Developers use SonarQube to analyze static code, making it a universal standard in the IT industry. SonarQube can make the code cleaner, more straightforward, and easier to read.
Moving ahead, let us understand how SonarQube works.
What is SonarQube?
SonarSource developed SonarQube as an open-source platform to continuously inspect or analyze developers’ code. It analyzes or scans all the static code written by developers and provides detailed reports on Bugs, Vulnerabilities, Code smells, code duplicates, and Security issues.
No matter whatever programming languages you have written your code, SonarQube supports 25+ programming languages through built-in rule sets. You can also extend that rule set using various plugins. You can find all the supported languages from this reference: Rules Sonarsource
Benefits of SonarQube

- Sustainability
Reduces complexity, possible vulnerabilities, and code duplications, as well as optimizes the life of applications. - Increase productivity
Reduces the scale, cost of maintenance, and risk of the application; as such, it eliminates the need to spend more time changing the code - Quality Code
Code quality control is an inseparable part of the software development process. - Detect Errors
Detects errors in the code and alerts developers to fix them automatically before submitting them for output - Increase consistency
Determines where the code criteria are breached and enhances the quality. - Business scaling
There is no restriction on the number of projects to be evaluated. - Enhance developer skills
Regular feedback on quality problems helps developers to improve their coding skills.
Why SonarQube?
So far, we have discussed SonarQube and its benefits. Now, let’s examine why we should use It.
As you know, developers are doing too much coding in their lives for many reasons, such as achieving project timelines and deliveries and fixing bugs on products to fulfill client requirements and make production stable. In that case, devs don’t look back on the quality of the code and fix the issues hurriedly. Also, leads do not have the time to review code fixes, and they directly move the buggy or non-quality code to the product, which leads to the failure of production performance at any time and, alternatively, creates impacts on costs for clients.
Ideally, this is a very wrong impression of developers and against the best practices that affect the developer’s career.
To avoid such scenarios and maintain good code quality, we have great free tools in the IT industry. One of them is SonarQube, which improves and delivers the best code quality on production each time devs change or add new code.

Time to set up and use SonarQube
We have seen the benefits and features of SonarQube. Now, it’s time to implement it into your system and leverage its features. Let’s start with what we require and how to set it up.
Before starting the setup of SonarQube, you need to check the below prerequisites in your system:
- JAVA (Oracle JRE 11 or OpenJDK 11), you can also find more [details]
- Should have NodeJS version 8 or higher installed
Download SonarQube
There are two options for downloading Sonar Scanner, you can choose any one
Get the LTS version from [Download]
Using Docker image
Sonar Scanner
There are two options for downloading Sonar Scanner, you can choose any one
Using following this link – sonar scanner
Using npm package
Follow the steps to run SonarQube
Below are commands that can be run from your cmd or terminal, either on Windows or Another OS. To set the SonarQube bin folder path cho on the platform, run the following command.
#For Windows(cmd):
C:\sonarqube\bin\windows-x86-64>StartSonar.bat
#For other OS (terminal):
C:\sonarqube\bin\[OS]>sonar.sh
If you are running SonarQube using a Docker image, you do not need to set up the above command.
Now SonarQube will be run on localhost and log in using default credentials (login: admin, password: admin)
Once you are logged in, we need to set up an analysis project.
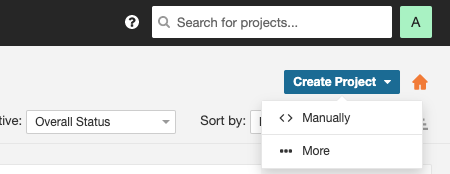
- Go to “Create Project” on the right side of the page and click on the manual tab.
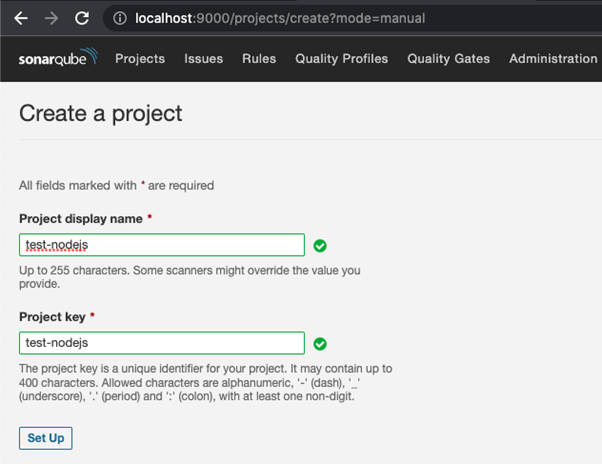
- Enter a project name and key name that will be used in future sonar properties.
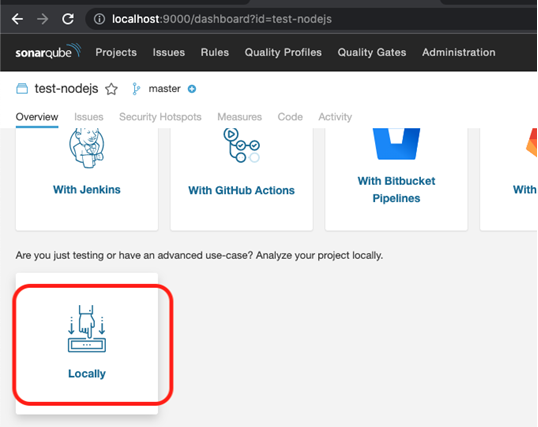
- Now click on sonar analysis setup for ‘Locally’
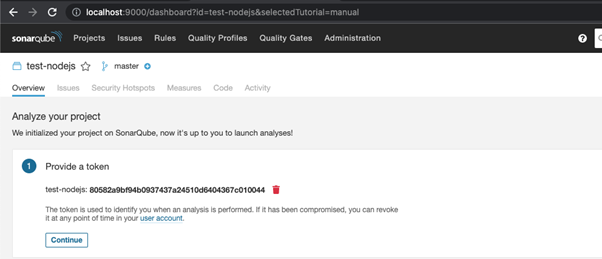
- Select ‘Generate a Token’

- Select the Programming Language that you are using in your project and the OS used

- Now you can run the sonar scanner by executing the command that is provided in the above screenshot
- OR you can add the scanner property in your project and use the sonar-scanner command in package.json
To do so, you need to add the dependency package below to your project.

Use the script below to run the scanner from the command.

Now run the below command to run the scanner.
The sonar property file will look like in the root folder:
sonar-project.properties
sonar.host.url=http://localhost:9000/
sonar.projectKey=test-nodejs
sonar.projectName=test-nodejs
sonar.login=****************************
sonar.projectVersion=1.0
sonar.sources=.
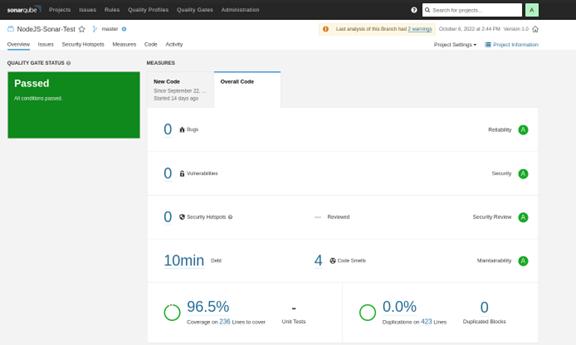
sonar.coverage.exclusions=node_modules/*,app.js,package.json,.scannerwork,.env,public/*,db/*,test/*You define your files in exclusions or in inclusion based on your needs. - Once the scanner analysis is done, you will be able to see the scanner report under the projects section for your project. It will look like the one below.
SonarLint with SonarQube
As you now have more knowledge of SonarQube and Scanner to improve your code quality and implement best code practices, there is also one package or extension available to check errors and issues in your local IDE before committing your code and before running SonarQube. Yes, you are right. We are discussing the SonarLint extension, which is available for almost all IDE editors.
Here, we are going to explain how to use SonarLint in VS Code. This will allow you to have clean code in advance before pushing it to your branch.
Steps to download and install SonarLint in VS Code
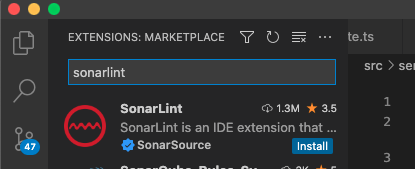
1. Open your VS Code IDE and click on the “Extensions” menu from the left side pane
2. Now search “sonarlint”, and it will appear in the first place, like below
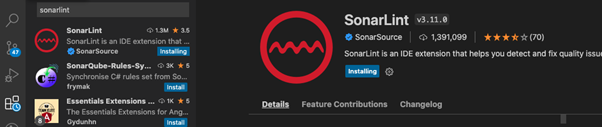
3. Now click on install, and it will start installing in your VS code. Once it’s done, it will show you the page where you will find all the details and it’s.

4. Once it’s installed, it will auto-enable in your current working directory project, as shown below in the “PROBLEMS” section, with its pre-resolution suggestion.
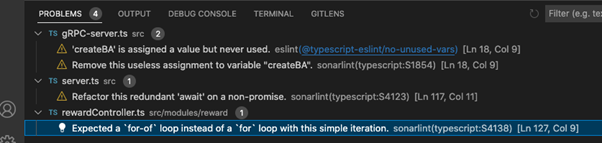
When you click on any problem, it will redirect you to the problem, which will be like

Now you are an expert developer, so you know how to fix it!!! Please fix it and commit it. So you don’t have to wait till you commit your code and run SonarQube.
Using this SonarLint, you can identify your issues and errors priorly and fix them. This will reduce your time, and you do not have to wait for the Sonar Scanner output. With this, productivity will increase, and there will be fewer chances to have bugs on production levels.
This quick tutorial document will help you kickstart SonarQube integration in your project by leveraging its core functionality.
Now that you have learned and integrated SonarQube, we can move on to writing test cases, which will help you test your code and ensure its quality.
Here are some insights of Unite Testing topic:
Software development necessitates unit testing, which ensures a high-quality product by testing each software component. Developers can quickly find and fix bugs before the product goes into production by using the Unit testing method. The correction of the isolated code is the primary objective of this unit testing.
Unit Testing: what is it?
The first level of testing, known as unit testing, involves examining each individual module or component of your code to prioritize and address bugs before they are released to production.
One method of testing, known as unit testing, is typically carried out by developers. However, quality assurance engineers also perform unit testing despite developers’ reluctance to test.
By providing the necessary inputs to the test script and asserting that the actual output matches the expected results, the developers create unit tests.
![Life cycle of Unit testing [PC: tutorialspoint]](https://www.solutionanalysts.com/blog/wp-content/uploads/2024/10/undefined-17.png)
Now that we’ve covered the fundamentals of unit testing let’s take a look at its advantages.
What are its advantages?
- Modifying existing functionality reduces bugs or defects in newly developed features. Hence, the cost of testing can decrease as defects are discovered early on.
- It improves design and makes it easier to refactor code, which ultimately improves the build’s quality.
- Since bugs are discovered in the early stages of development, this approach has the potential to reduce overall testing costs.
- Because unit testing is more reliable, it is easier to refactor code.
- This training additionally conditions engineers to reevaluate how they code.
- It is precisely developing modular parts that can be mocked if they have dependencies.
- Tests can be automated, which is very helpful for scaling code maintenance.
- Overall, it raises the code’s quality.
![Advantages of Unit testing [PC: TestingExperts]](https://www.solutionanalysts.com/blog/wp-content/uploads/2024/10/undefined-18.png)
What are the Detriments of Unit testing?
- Integration or interface issues between two modules cannot be detected by unit testing. Non-functional aspects like the system’s scalability and performance cannot be tested.
- It is unable to detect system-wide errors involving multiple modules.
- The application’s business requirements or functional correctness cannot be guaranteed by unit tests as well.
- Depending on the level of complexity, one or more unit tests are typically required; hence, the amount of code that must be written must increase.
- It is very challenging to test the user interface (UI), but it is useful for testing the implementation of business logic. However, unit testing is not great for UI as it is a back-end test. It can check that a calculation is correct, but it can’t verify whether the results display correctly to the user.
- Unit Testing cannot identify all programming errors, and it can’t test integration errors.
The following are some of the best unit testing tools and frameworks, some of which we will use in our NodeJs test case integration:
– Mocha – a JavaScript test framework running on Node.js and in the browser.
– Chai – is an assertion library that adds a more expressive language to tests.
– Jasmin – a behavior-driven development (BDD) framework for testing JavaScript code.
– Jest – for testing javascript front-end and back-end applications.
– There are a lot of unit testing frameworks available based on different languages,
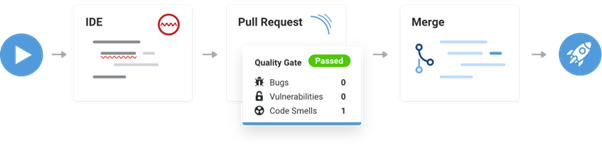
Workflow
This is the unit testing workflow, which will help you better understand how it works.

Now that we’ve seen the advantages, drawbacks, and workflow, let’s try putting it into your system so we can generate more ideas. First things first: what we need and how to set it up.
Before starting, you need to check the below prerequisites in your system:
– JAVA (Oracle JRE 11 or OpenJDK 11), you can also find more [details]
– Should have NodeJS version 8 or higher installed
– SonarQube and Sonar Scanner (refer SonarQube Integration in NodeJs) to download and install Sonar Scanner and SonarQube.
How to integrate it in NodeJs
Assuming that all the above prerequisites are installed in your system now, you need to install two more npm packages by using the following steps.
1) Install globally
npm install mocha -g
OR
2) install in the current directory
npm install mocha –save-dev OR npm install mocha –save
Which will be shown in your package.json file in the dependencies object below

After that, you need to add a test script in your package.json file in the script object.
“test”: “mocha –exit –colors src/test/**/*.ts”,
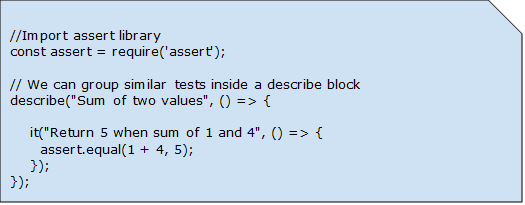
Here is an example of a Test case:
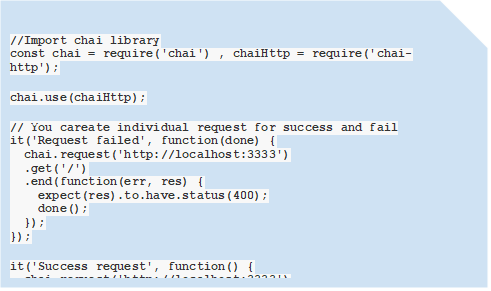
We can also write test cases for third-party API-called functions as well by using the Chai plugin. Now let’s look at the following steps for installing Chai:
1) Install globally
npm install chai -g
OR
2) install in the current directory
npm install chai –save-dev OR npm install chai –save
Which will be shown in your package.json file in the dependencies object below

Here is an example of a Test case:
Run the below command in the terminal in your project root directory to start the sonar scanner:
npm run test
npm, run coverage // will show your code coverage report on Sonar. To do this, add the script below to your package.json script object.
“coverage”: “nyc –reporter=lcov npm run test”
npm run Sonar
Once the command runs successfully, your dashboard will look like this:
In short, when businesses conduct software testing well from the beginning of product development, they can ensure bug-free and high-quality software. Teams test the program’s individual modules using this testing strategy. This strategy allows teams to achieve certain advantages, such as early detection of bugs and correction of the code before costly resolutions in the SDLC. The earliest form of testing that focuses on the code is called unit testing.
Businesses must engage in unit testing from the beginning of the software development lifecycle (SDLC) to guarantee quality and bug-free software.
As a result, defects are discovered, analyzed, and fixed when a straightforward automated test could have detected them.

If you’re seeking a partner to support your project’s technical needs and ensure its success, look no further. Contact Solution Analysts to arrange a free consultation call, where we can discuss how our technical expertise can be tailored to meet your specific requirements and help you achieve your goals.

Hitesh Sapariya
Technical Lead
Hitesh Sapariya is a Technical Leader at Solution Analysts. He brings over 14 years of experience and a genuine passion for software development to his role. He is an adept troubleshooter with a strong attention to detail, his expertise spans a diverse range of technologies, including Next.js, Node.js, Angular, React, MongoDB, MySQL, and PostgreSQL.